Push Fold Fundamentals: Keiten
If you haven't already, check out the first post in the push fold fundamentals series.
In the context of push/fold within 5 turns of rkk, we will incorrectly use the term keiten to refer to tenpai hands with or without yaku. There is a practical reason for this: if we decide that we should push a tenpai hand with no yaku, it follows that we would push the same hand if it had a yaku.
To supplement this, we will also refer to some stats from Statistical Mahjong Strategy By Miinin (SMS), a chart from the osamuko blog, and Naga AI decisions. For dealinrate estimation, we will refer to this post from the pathofhouou blog.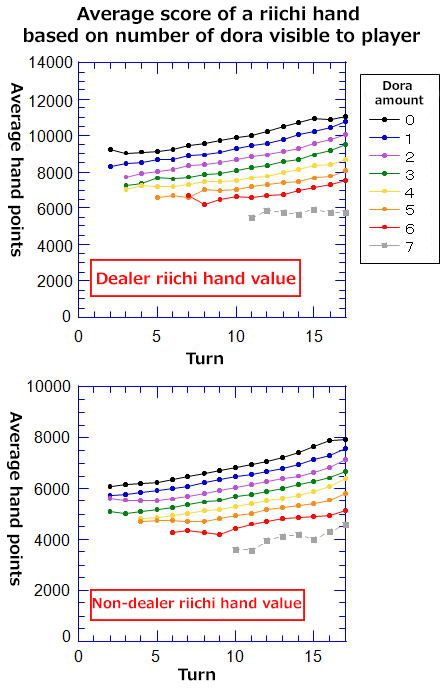 From the chart, we observe increasing average dealin values over time. The later the turn number, the more time players will have to build value. Instead of the SMS averages, let's use the 4 visible dora line in the above charts on Turn 17 as our dealin value estimates for the keiten push math. We will use the following estimates: non dealer riichi: 6500. Non dealer riichi + ippatsu ~ dealer riichi: 8500. Dealer ippatsu: 12000. From the SMS numbers, we will use the same estimate for non dealer riichi + ippatsu and dealer riichi. We don't have a chart for dealer ippatsu dealin value, so I simply added ~1000 to the SMS average as an estimate. This is based on the roughly ~1K dealin value difference comparing SMS numbers to the osamuko turn 17 numbers in the non dealer riichi and dealer riichi cases.
 Exercise: Is pushing 6s higher EV than folding?
Here are some hints:
For simplicity, let's first assume that the left player is the only opponent who is tenpai. Because of houtei, we will use an ippatsu dealin estimate 8500. This is an upper bound, since the riichi player cut dora, we see the red 5p, and 8500 is the average dealin value for 4 dora visible - if we wanted to use all of the available information, we would use a lower value for 5 dora visible.
If we push, we dealin 14% of the time, losing an average of 8500pts. The tile will pass the other 86% of the time, and we will gain 1500 pts, assuming exactly two players will be tenpai. This puts our push EV at .14 * -8500 + .86 * 1500 = 100. If we fold, only the left player will be tenpai, and we will lose 1000 pts. Our push EV (100) is greater than our fold EV (-1000). Naga agrees with pushing this tile.

Let's use the average dealin values we estimated from SMS numbers and the osamuko charts. Plugging in y = 6500, 8500, and 12000, we get the following dealin thresholds: 31.3% vs non dealer, 25.0% vs non dealer houtei / dealer, 18.5% vs dealer houtei.
We also didn't consider the possibility of an opponent drawing their winning tile after we pushed our dangerous tile. If the player on our right were the riichi player instead of the player on our left, and the right player got the last draw, it's possible that we push our dangerous tile, it passes, and then the riichi player tsumos, lowering the reward of pushing.
Caveats aside, I still think this exercise was useful to build intuition as to why we can push such high dealin tiles for keiten. I want to highlight two keiten push fold concepts in particular.
First, assuming rkk is guaranteed, even if we push a very dangerous 30% dealin tile for keiten, 70% of the time, it won't dealin. In this majority case, we will gain 2500 pts over folding vs 1 or 2 opponent tenpai, and 3000 pts over folding vs 3 opponent tenpai. The large rkk tenpai percentages of 70+% often dominate the EV calculation.
Second, I want to emphasize just how rare a 30% dealin tile is. According to the live suji chart, our half suji 6s with 4 live suji only deals in ~14% of the time. If it we had a double musuji 6 with 4 live suji, it would dealin ~27% of the time, meaning we could still push it for EV in many keiten situations.
With a better understanding of how last draw keiten math works, let's take a look at the thresholds from the nisi chart.
 Round EV refers to the average score change in a single round. The next scoring system is 30-10 uma. 7d pt EV refers to game rewards of [+90, +45, 0, -135]. Ko refers to non dealer. Oya refers to dealer. The number X in a cell means we can push that dealin percentage with X draws afterwards.
Assume that for all charts, the south seat gets the last draw. For the Ko vs Ko chart, we are the south seat, meaning we are pushing on the houtei turn. For the Ko vs Oya chart, we are the west seat.
Because the charts assume no calls and specific seats, the names can be misleading. It is important that we use the most relevant chart for each situation. If we are projected to push the houtei tile vs non dealer, we should use Ko vs Ko chart, even if we are the dealer. If we are not projected to push a houtei tile vs non dealer, we should use the Oya vs Ko chart, even if we are not dealer. If we are pushing non houtei vs dealer we can use the Ko vs Oya chart. There is no corresponding chart for houtei push vs dealer.
Specific pt distributions are used for different positions. E1 refers to the East 1 round. S1 refers to the South 1 round. 25K flat refers to a pt spread of 25K/25K/25K/25K. 40K first refers to a pt spread of 40K/30K/20K/10K. 30K first refers to a spread of 30K/27K/23K/20K. 27K first refers to a spread of 27K / 25K / 25K / 23K. 23K last uses the same pt spread as 27K first. 20K last uses the same pt spread as 30K first. 10K last uses the same pt spread as 40K first.
Let's first look at the Round EV dealin thresholds: 32% vs non dealer (riichi player no tsumo chance), 24% vs non dealer houtei, and 20% vs dealer (dealer tsumo chance after we push). These thresholds are within 5% of our estimates above.
Now let's look at how the Round EV thresholds change the further we get from the final turn (T17 for the Ko vs Oya chart, T18 for the other charts). Let's call the final turn x. For the Ko vs Ko chart, the thresholds for turn x, x-1, x-2, x-3 are 24, 24, 16, 12. For Ko vs Oya, the thresholds are 20, 12, 8, 4. For Oya vs Ko, the thresholds are 32, 24, 20, 12. We can memorize the chart thresholds for the last 3-4 turns with the following rules:
Notice that the East 1 25K Flat Dan pt EV thresholds are the exact same as the Round EV thresholds. We want to maximize our Round EV in East 1.
Finally, let's look at how these thresholds change when looking at S1 Dan pt EV instead of E1. For the Ko vs Ko and Ko vs Oya chart, if we are in last place, we can push tiles that are more dangerous than the Round EV threshold by 4-8%, depending on the exact position. If we are in first place, we can lower our dealin threshold by 0-8% depending on the exact position. For the Oya vs Ko chart, our thresholds may change by up to 16% in either direction. From first place, we have an incentive to take less risk and pass our dealership to move the game closer to South 4 in a good position. From last place, we have an incentive to continue our dealer turn and make a comeback. However when our score is between 20K and 27K, our thresholds only change by 4-8%. The larger threshold shifts occur at the more extreme positions.
There are a few potential reasons for this. One possibility is that people experience loss aversion. Because Naga is an AI that learns from humans, it may learn to avoid risk, even in spots where a simulator like nisi thinks pushing may be higher EV. However, since Naga is only trained on the logs of a select few top players, this theory may depend on the specific players in the training dataset. A second reason may be that top tenhou players will usually be playing with negative sum rates (8-10 dan rates), which encourages some reduction in risk. A third reason may be that Naga is modifying its risk threshold based on complicating factors. One complicating factor is the probability of dealing in to non riichi players. How do we estimate the tenpai chances of these players, and the expected dealin value to these players?
I believe that the nisi charts are the best baseline for maximizing EV. However, Naga should be considered as a slightly risk averse perspective that may provide insight into how to adjust for open and dama players. In the following screenshots, if a tile has one bar above it, it is the decision of Nishiki. In the last screenshot, which has two bars, the purple bar is Nishiki, and the gray bar is Kagashi. With 6 live suji, half suji 6 has a dealinrate of 10.4% according to this live suji chart. There are a few modifiers we can make to this dealinrate. Shimo declared riichi on 5p, increasing the 6p dealinrate. However, 6p is one chance, and we hold 0p, decreasing the dealinrate. According to SMS, on turn 9, a half suji one chance tile has a dealinrate of 4.1%. It's difficult to conclude how opposing factors such as one chance and riichi 5p interact. To be cautious, we will estimate the dealinrate at a high 15%.
The player across from us seems to be folding, and the left player pushed a few suji tiles vs riichi, so they may be tenpai. Let's assume our left player is 50% tenpai, as the Naga display predicts. There are also 6 live suji to this player, but 6 is double musuji, putting the chart dealinrate at 21%. Dividing this by 2 because they're only 50% tenpai, Our total dealinrate estimate is 15% + 10.5% = 25.5%. This is greater than the 24% threshold from the nisi chart, but dealing in to our left player will have a significantly lower dealin value than the riichi dealin value. If we weigh their dealinrate by 2/3 to account for this, our normalized dealinrate would be 22%, meaning we should push according to the chart. This normalized 22% uses a conservative dealinrate estimate vs the riichi player, so this is solidly a push according to the chart's 24% threshold.
Naga (Nishiki) thinks that it is close, but decides to fold. We have a furiten dora 1 hand waiting on 4 tiles. We would need to push 3 turns for rkk tenpai payments, corresponding to a chart threshold of 20%. Note that we are using the Oya vs Ko chart despite being non dealer because we won't have to push a houtei tile on the final turn. If we had to push a houtei tile, we would instead use the Ko vs Ko chart. According to Figure 3.6(a) in SMS, suji trap 7 dealinrate is ~12% on Turn 15, so we can comfortably push. The fact that this furiten hand can still win by tsumo should increase our threshold above 20%, since the chart assumes we can't ron or tsumo. Naga also pushes.
 With 6 live suji, 2s and 8p have a base dealinrate of 11.6% according to the live suji chart. The Round EV chart provides a dealin threshold of 20%. As last place in South 1, we should increase this threshold by 4-8%. Let's be conservative and use 24% as our threshold. Since 11.6% is so far below our threshold, we can ignore the two other players who we could potentially dealin to and conclude that this is a chart push. Which tile is safer? 8p has 2 weak blockers in 7p. 2s is double one chance, with 3 4s and 3 3s missing. The 4s riichi may increase the dealinrate of 2s though. Naga decides to go with the 2s push.
 With 5 live suji, half suji 4m has a dealinrate to the riichi player of 12.2%. Using the Ko vs Ko chart for this houtei push, we get a dealin threshold of 24%. We can adjust this threshold by 4-8% from our S1 2nd position of 25K. As discussed in the oya vs ko chart, there is the additional factor of whether or not to pass our dealer turn, but I think this is a secondary factor in a non extreme position (10K last or 40K first). We don't love pushing against last place riichi, but the 8% reduction seems unnecessary and is usually applied to more extreme positions. The 40K first position uses an 8% reduction, and the 30K first position uses a 4% reduction. Let's use an in between adjustment of 6% for a threshold of 18%.
It's hard to decide how the non riichi players, who pushed dangerous tiles against the riichi, should affect our decision. On one hand, we may dealin to these players, increasing our risk. On the other hand, the more players are tenpai, the more points we lose folding, slightly counterbalancing the risk of dealing in. Is the additional risk of the non riichi players enough to push us above our 18% threshold? This is a close decision because of these pushing players. Nishiki thinks that we should fold, and Kagashi thinks that we should push.
In the next post of this series, I will analyze mawashi, calling from 1-shanten to tenpai vs riichi, and dama pushes.
What is Keiten?
The term keiten refers to a tenpai hand with no yaku. Although these hands rarely win by ron or tsumo, they can gain points if a round goes to exhaustive draw (a.k.a. Ryuukyoku, rkk). In this post, we will analyze the EV of pushing dangerous tiles against 1 riichi with 5 or fewer draws until rkk.In the context of push/fold within 5 turns of rkk, we will incorrectly use the term keiten to refer to tenpai hands with or without yaku. There is a practical reason for this: if we decide that we should push a tenpai hand with no yaku, it follows that we would push the same hand if it had a yaku.
Data Sources
The main chart we will analyze in this post will be from this Mahjong Math post, which uses the nisi simulator to estimate EV. If you find this post helpful, consider supporting the Mahjong Math group by purchasing the post for 500 yen, which will give you access to additional round EV charts, which aren't covered in this blog post.To supplement this, we will also refer to some stats from Statistical Mahjong Strategy By Miinin (SMS), a chart from the osamuko blog, and Naga AI decisions. For dealinrate estimation, we will refer to this post from the pathofhouou blog.
Dealin Value By Turn and Dora
According to SMS, the average dealin value to non dealer riichi is 5300 for non ippatsu and 7600 for ippatsu. For dealer riichi, the average dealin values are 7500 and 10900 for non ippatsu and ippatsu respectively. These averages will be underestimates when pushing for keiten, as shown in the following chart from osamuko (original Japanese post by Kita Haz).Last Draw Push EV
Here are some hints:
- The average dealin value against non dealer on the ippatsu turn is upper bounded by 8500.
- If we push and 6s passes, how many pts will we win? If we fold, how many pts will we lose?
- With 4 live suji remaining, 6s has a dealinrate of ~14% according to the live suji chart. Let's assume that this is the true dealinrate and ignore the chance of dealing in to other players.
- Similar to the calculations in the first blog post, we should be able to estimate our EV using the dealin average, dealinrate, and rkk tenpai EV. We can then compare this number to the fold EV.
For simplicity, let's first assume that the left player is the only opponent who is tenpai. Because of houtei, we will use an ippatsu dealin estimate 8500. This is an upper bound, since the riichi player cut dora, we see the red 5p, and 8500 is the average dealin value for 4 dora visible - if we wanted to use all of the available information, we would use a lower value for 5 dora visible.
If we push, we dealin 14% of the time, losing an average of 8500pts. The tile will pass the other 86% of the time, and we will gain 1500 pts, assuming exactly two players will be tenpai. This puts our push EV at .14 * -8500 + .86 * 1500 = 100. If we fold, only the left player will be tenpai, and we will lose 1000 pts. Our push EV (100) is greater than our fold EV (-1000). Naga agrees with pushing this tile.
Dealinrate Threshold Math
Let's use the average dealin values we estimated from SMS numbers and the osamuko charts. Plugging in y = 6500, 8500, and 12000, we get the following dealin thresholds: 31.3% vs non dealer, 25.0% vs non dealer houtei / dealer, 18.5% vs dealer houtei.
Caveats and Takeaways
We made some assumptions in this analysis, which may lead to some inconsistencies with the nisi chart. We assumed that only our riichi opponent is tenpai, but the other 2 players may also be tenpai, possibly with or without a yaku. If more opponents are tenpai, this increases our dealinrate. However, if we dealin to a dama tenpai, it would likely be a lower value hand than if we dealt in to the riichi hand. Folding is also worse vs 2+ tenpai, since the penalty for not being tenpai at rkk is -1500 vs 2 tenpai, and -3000 vs 3 tenpai.We also didn't consider the possibility of an opponent drawing their winning tile after we pushed our dangerous tile. If the player on our right were the riichi player instead of the player on our left, and the right player got the last draw, it's possible that we push our dangerous tile, it passes, and then the riichi player tsumos, lowering the reward of pushing.
Caveats aside, I still think this exercise was useful to build intuition as to why we can push such high dealin tiles for keiten. I want to highlight two keiten push fold concepts in particular.
First, assuming rkk is guaranteed, even if we push a very dangerous 30% dealin tile for keiten, 70% of the time, it won't dealin. In this majority case, we will gain 2500 pts over folding vs 1 or 2 opponent tenpai, and 3000 pts over folding vs 3 opponent tenpai. The large rkk tenpai percentages of 70+% often dominate the EV calculation.
Second, I want to emphasize just how rare a 30% dealin tile is. According to the live suji chart, our half suji 6s with 4 live suji only deals in ~14% of the time. If it we had a double musuji 6 with 4 live suji, it would dealin ~27% of the time, meaning we could still push it for EV in many keiten situations.
With a better understanding of how last draw keiten math works, let's take a look at the thresholds from the nisi chart.
Nisi Chart Dealinrate Thresholds
Assume that for all charts, the south seat gets the last draw. For the Ko vs Ko chart, we are the south seat, meaning we are pushing on the houtei turn. For the Ko vs Oya chart, we are the west seat.
Because the charts assume no calls and specific seats, the names can be misleading. It is important that we use the most relevant chart for each situation. If we are projected to push the houtei tile vs non dealer, we should use Ko vs Ko chart, even if we are the dealer. If we are not projected to push a houtei tile vs non dealer, we should use the Oya vs Ko chart, even if we are not dealer. If we are pushing non houtei vs dealer we can use the Ko vs Oya chart. There is no corresponding chart for houtei push vs dealer.
Specific pt distributions are used for different positions. E1 refers to the East 1 round. S1 refers to the South 1 round. 25K flat refers to a pt spread of 25K/25K/25K/25K. 40K first refers to a pt spread of 40K/30K/20K/10K. 30K first refers to a spread of 30K/27K/23K/20K. 27K first refers to a spread of 27K / 25K / 25K / 23K. 23K last uses the same pt spread as 27K first. 20K last uses the same pt spread as 30K first. 10K last uses the same pt spread as 40K first.
Let's first look at the Round EV dealin thresholds: 32% vs non dealer (riichi player no tsumo chance), 24% vs non dealer houtei, and 20% vs dealer (dealer tsumo chance after we push). These thresholds are within 5% of our estimates above.
Now let's look at how the Round EV thresholds change the further we get from the final turn (T17 for the Ko vs Oya chart, T18 for the other charts). Let's call the final turn x. For the Ko vs Ko chart, the thresholds for turn x, x-1, x-2, x-3 are 24, 24, 16, 12. For Ko vs Oya, the thresholds are 20, 12, 8, 4. For Oya vs Ko, the thresholds are 32, 24, 20, 12. We can memorize the chart thresholds for the last 3-4 turns with the following rules:
- Our dealin thresholds for the final turn push are 32%, 24%, and 20% (vs ko, ko houtei, and oya)
- For ko houtei, the turn 17 and turn 18 thresholds are the same. This is a result of the higher dealin value for the turn 18 houtei push.
- For the next number in the sequence, subtract 8% from the last threshold
- For the next number in the sequence, subtract 4% from the last threshold
Notice that the East 1 25K Flat Dan pt EV thresholds are the exact same as the Round EV thresholds. We want to maximize our Round EV in East 1.
Finally, let's look at how these thresholds change when looking at S1 Dan pt EV instead of E1. For the Ko vs Ko and Ko vs Oya chart, if we are in last place, we can push tiles that are more dangerous than the Round EV threshold by 4-8%, depending on the exact position. If we are in first place, we can lower our dealin threshold by 0-8% depending on the exact position. For the Oya vs Ko chart, our thresholds may change by up to 16% in either direction. From first place, we have an incentive to take less risk and pass our dealership to move the game closer to South 4 in a good position. From last place, we have an incentive to continue our dealer turn and make a comeback. However when our score is between 20K and 27K, our thresholds only change by 4-8%. The larger threshold shifts occur at the more extreme positions.
Naga Decisions
In an interview from June 2023, a Naga developer explains that Naga is trained on logs from a few top human players. The two strongest Naga versions are Nishiki and Kagashi. Nishiki is trained on at least 3 players, and Kagashi on 1 player. I bring this up because in the following screenshots, we will see Nishiki fold one hand where pushing is recommended by the nisi chart, as well as fold in a borderline position.There are a few potential reasons for this. One possibility is that people experience loss aversion. Because Naga is an AI that learns from humans, it may learn to avoid risk, even in spots where a simulator like nisi thinks pushing may be higher EV. However, since Naga is only trained on the logs of a select few top players, this theory may depend on the specific players in the training dataset. A second reason may be that top tenhou players will usually be playing with negative sum rates (8-10 dan rates), which encourages some reduction in risk. A third reason may be that Naga is modifying its risk threshold based on complicating factors. One complicating factor is the probability of dealing in to non riichi players. How do we estimate the tenpai chances of these players, and the expected dealin value to these players?
I believe that the nisi charts are the best baseline for maximizing EV. However, Naga should be considered as a slightly risk averse perspective that may provide insight into how to adjust for open and dama players. In the following screenshots, if a tile has one bar above it, it is the decision of Nishiki. In the last screenshot, which has two bars, the purple bar is Nishiki, and the gray bar is Kagashi.
The player across from us seems to be folding, and the left player pushed a few suji tiles vs riichi, so they may be tenpai. Let's assume our left player is 50% tenpai, as the Naga display predicts. There are also 6 live suji to this player, but 6 is double musuji, putting the chart dealinrate at 21%. Dividing this by 2 because they're only 50% tenpai, Our total dealinrate estimate is 15% + 10.5% = 25.5%. This is greater than the 24% threshold from the nisi chart, but dealing in to our left player will have a significantly lower dealin value than the riichi dealin value. If we weigh their dealinrate by 2/3 to account for this, our normalized dealinrate would be 22%, meaning we should push according to the chart. This normalized 22% uses a conservative dealinrate estimate vs the riichi player, so this is solidly a push according to the chart's 24% threshold.
Naga (Nishiki) thinks that it is close, but decides to fold.
It's hard to decide how the non riichi players, who pushed dangerous tiles against the riichi, should affect our decision. On one hand, we may dealin to these players, increasing our risk. On the other hand, the more players are tenpai, the more points we lose folding, slightly counterbalancing the risk of dealing in. Is the additional risk of the non riichi players enough to push us above our 18% threshold? This is a close decision because of these pushing players. Nishiki thinks that we should fold, and Kagashi thinks that we should push.
Summary
In conclusion, in East 1, we want to maximize our Round EV. To do so, we should be pushing very dangerous tiles for rkk payments - up to 32% on turn 17 vs non dealer. When playing positionally in South 1, we should modify our thresholds by up to 8% vs non dealer houtei and vs dealer, depending on our position. Against non dealer as dealer, we can modify our thresholds by up to 16%, depending on our position. Naga, an AI trained on a few top human players, may play more risk averse than the nisi simulator suggests, especially vs open hands, and when non riichi players push dangerous tiles vs the riichi. Nishiki seems to use slightly lower thresholds than the charts by roughly 4-8%. Kagashi, which is trained on a single player, is more willing to push.In the next post of this series, I will analyze mawashi, calling from 1-shanten to tenpai vs riichi, and dama pushes.


Comments
Post a Comment